本文共 4506 字,大约阅读时间需要 15 分钟。
node oauth2验证
In my last article (), we looked at another form of authentication called the OAuth authentication which involves sign in or signup using social media.
在我的上一篇文章( )中,我们介绍了另一种身份验证形式,称为OAuth身份验证,它涉及使用社交媒体登录或注册。
In this first section, we set up our Express app with some routes and our HTML form, installed passport-Facebook and configured the strategy.
在第一部分中,我们使用一些路线和HTML表单设置了Express应用程序,安装了password-Facebook,并配置了该策略。
In this section, we'll finally set up the authentication strategy it's self on the Facebook developers platform and tests our code.
在本部分中,我们最终将在Facebook开发人员平台上自行设置身份验证策略,并测试我们的代码 。
In , we created 2 files: app.js and index.html.
在 ,我们创建了2个文件: app.js和index.html 。
Create a file app.js and type the following code,
创建一个文件app.js并输入以下代码,
/* EXPRESS SETUP */const express = require('express');const app = express();app.get('/', (req, res) => res.sendFile('index.html', { root: __dirname}));const port = process.env.PORT || 8080;app.listen(port, () => console.log('App listening on port ' + port));/* CONFIGURATION */const passport = require('passport');app.use(passport.initialize());app.use(passport.session());//success routeapp.get('/success', (req, res) => res.send("You have successfully logged in"));//error routeapp.get('/error', (req, res) => res.send("error logging in"));passport.serializeUser(function(user, cb) { cb(null, user);});passport.deserializeUser(function(obj, cb) { cb(null, obj);}); Node.js OAuth Sign in with Facebook
最后步骤 (Final Steps)
To authenticate with facebook, we need to set up some legal issues with the service provider (facebook).
要通过Facebook进行身份验证,我们需要与服务提供商(facebook)建立一些法律问题。
Open and create an app where you'll add your node app authentication url and also, you'll be given an APP_ID and APP_SECRET.
打开并创建一个应用程序,您将在其中添加节点应用程序身份验证URL,并且还将获得一个APP_ID和APP_SECRET 。
Note: Most articles have not emphasized on the fact that APP ID and APP SECRET can also be called clientID and clientSecret respectively.
注意:大多数文章都没有强调APP ID和APP SECRET也可以分别称为clientID和clientSecret 。
Remember: Please your APP_ID and APP_SECRET should be confidential
切记:请您的APP_ID和APP_SECRET应该保密
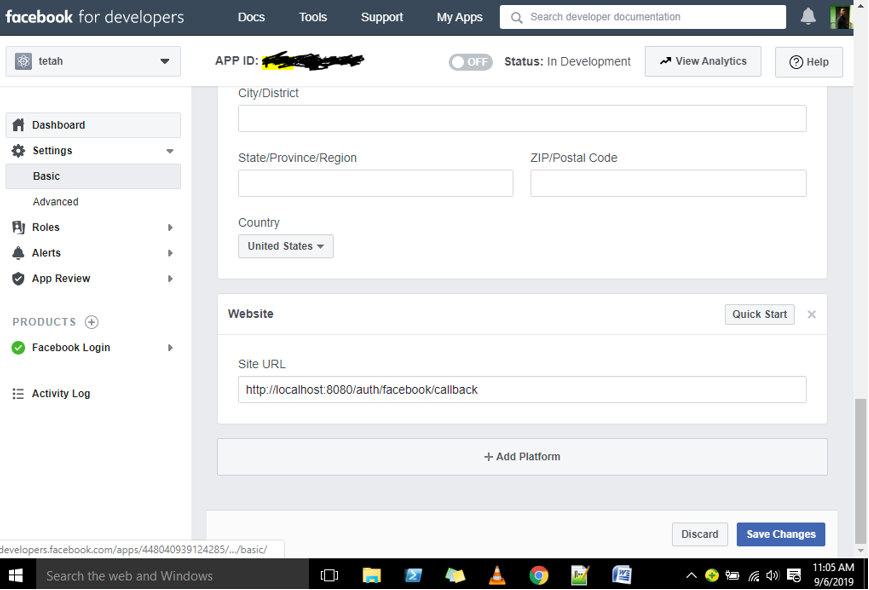
As you can see, the site url should be same with url connected to our sign in with facebook link.
如您所见, 网站网址应与通过Facebook链接登录到我们的网址相同。
To get your app id and app secret, click on settings and then move to basics.
要获取您的应用ID和应用秘诀,请点击设置 ,然后转到基本 。
Now that we have successfully gotten our app id and secret, let's apply them to our code.
现在,我们已经成功获取了应用程序ID和密码,让我们将其应用于代码。
Open the app.js file and add the following code below,
打开app.js文件,并在下面添加以下代码,
const FacebookStrategy = require('passport-facebook').Strategy;const FACEBOOK_APP_ID = 'your app id';const FACEBOOK_APP_SECRET = 'your app secret';passport.use(new FacebookStrategy({ clientID: FACEBOOK_APP_ID, clientSecret: FACEBOOK_APP_SECRET, callbackURL: "/auth/facebook/callback" }, function(accessToken, refreshToken, profile, cb) { return cb(null, profile); }));app.get('/auth/facebook', passport.authenticate('facebook'));/* app.get('/auth/facebook', passport.authenticate('facebook', { scope: ['user_friends', 'manage_pages', 'user_photos'] })); */app.get('/auth/facebook/callback', passport.authenticate('facebook', { failureRedirect: '/error' }), function(req, res) { res.redirect('/success'); }); The code above proceeds to handle the authentication request putting into action the success and error routes depending on the results obtained from authentication.
上面的代码继续处理身份验证请求,根据从身份验证获得的结果,将成功和错误路由付诸实践。
The lines in the comment are used for permissions. The scope option asks the user permission to access certain important information like facebook pages, photos, friends and so on.
注释中的行用于权限。 范围选项要求用户访问某些重要信息,例如Facebook页面,照片,朋友等。
The code above can also be gotten from the passport js official website.
上面的代码也可以从passport js官方网站获得。
So if the user successfully logs in with his or her Facebook account, the web page will display ''you have successfully logged in''
因此,如果用户成功使用他或她的Facebook帐户登录,则网页将显示“您已成功登录”
Finally, let's run and see our output.
最后,让我们运行并查看输出。
Open a terminal from your project folder and run the command.
从项目文件夹中打开一个终端,然后运行命令。
Node app.js


You can also visit the official website of passport to learn more @
您也可以访问护照的官方网站,以了解更多信息@
Thanks for coding with me! See you @ the next article. Feel free to drop a comment or question.
感谢您与我编码! 下次见。 随意发表评论或问题。
翻译自:
node oauth2验证
转载地址:http://vyxzd.baihongyu.com/